I have a CentOS 5 virtual machine and I added 20GB more to disk size. How do I initialize and extend the available space?
I tried loading GParted as well, but the drive is locked; how do I unlock it?
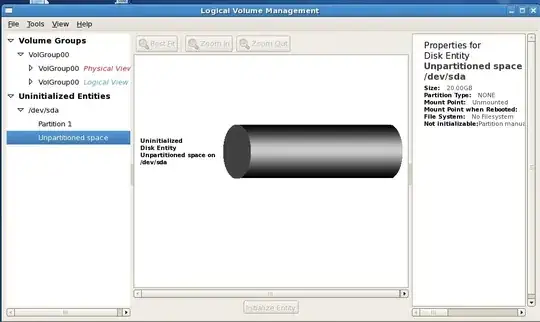
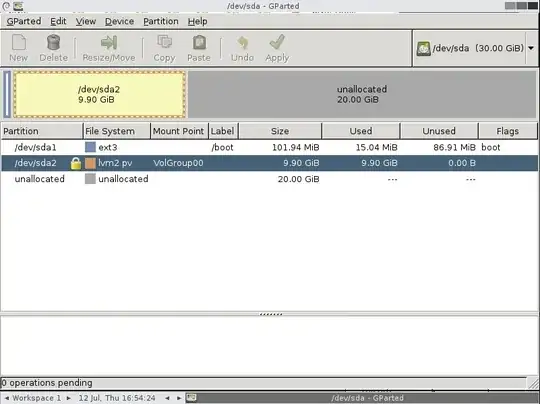
You're not going to be able to use GParted because the filesystem is on LVM and GParted does not support that.
First, TAKE A BACKUP OF THE VM. Then perform the following as "root" from a command line.
It looks like you've already rebooted but just in case, ensure the kernel recognizes the larger disk
echo 1 > /sys/class/scsi_disk/0:0:0:0/device/rescan
Resize the second partition with fdisk
fdisk /dev/sda
p     # print current
d     # delete
- 2
n     # create
- p   # primary partition
2     # partition number
- default first/last cylinders
t     # change partition id
- 2
- 8e (hex code)
p     # print the current again to verify it's expanded
w     # write changes
Reboot the virtual machine
shutdown -r now
Once it's back up, resize the LVM physical volume
pvresize /dev/sda2
Now resize the LVM logical volume (NOTE: I'm unable to decipher what your logical volumes name is based on the screenshots and thus am assuming LogVol00. You can determine this by running lvdisplay.)
lvresize -l +100%FREE /dev/VolGroup00/LogVol00
Finally, lets resize the filesystem
resize2fs -p /dev/VolGroup00/LogVol00
Verify the filesystem is larger
df -h
Done
The below steps extended my partition from 12G to 26GB on a VMWare EXSi 5.5 running Centos 6 EXT4 VPS.
1) Identify the device name, which is by default /dev/sda, and confirm the new size by running the command:
# fdisk -l
2) Get list of partitions for /dev/sda device:
# ls -al /dev/sda*

brw-rw---- 1 root disk 8, 0 Dec 29 15:32 /dev/sda
brw-rw---- 1 root disk 8, 1 Dec 29 15:32 /dev/sda1
brw-rw---- 1 root disk 8, 2 Dec 29 15:32 /dev/sda2
3) Create new primary partition
# fdisk /dev/sda

Then type:
  n (enter) [create new partition]
  p (enter) [primary partition]
  3 (enter) [next available number from listed /dev/sda partitions in 2)
  (enter)   [start cylinder]
  (enter to use all available physical space) or specify size in +cylinders, +size{K,M,G}
  t (enter) [change partition type]
  3 (enter) [selecting /dev/sda3 partition]
  8e (enter) [this sets partition type to Linux LVM or type L then enter to see list of types]
  w (enter)

  The partition table has been altered!
4) Reboot Centos 6.X then log back in with root privileges
# reboot
5) Check the new partition is ready and type '8e':
# fdisk -l

Device Boot      Start         End      Blocks   Id  System
/dev/sda1   *           1          64      512000   83  Linux
Partition 1 does not end on cylinder boundary.
/dev/sda2              64        2089    16264192   8e  Linux LVM
/dev/sda3            2089        3916    14678054   8e  Linux LVM
6) Create physical volume:
# pvcreate /dev/sda3

Physical volume "/dev/sda3" successfully created
7) Find out volume group name:
# vgdisplay

--- Volume group ---
VG Name               vg_app1
...
8) Extend the physical volume:
# vgextend vg_app1 /dev/sda3

Volume group "vg_app1" successfully extended
9) Extend the existing volume group to the new physical volume (+100%FREE can be altered to desired size). Since we are extending root partition hence pointing to lv_root in vg_app1 volume group.
# lvextend -l +100%FREE /dev/vg_app1/lv_root

Size of logical volume vg_app1/lv_root changed from 11.63 GiB (2978 extents) to 25.63 GiB (6561 extents).
Logical volume lv_root successfully resized
10) Resize logical root volume:
# resize2fs /dev/vg_app1/lv_root

resize2fs 1.41.12 (17-May-2010)
Filesystem at /dev/vg_app1/lv_root is mounted on /; on-line resizing required
old desc_blocks = 1, new_desc_blocks = 2
Performing an on-line resize of /dev/vg_app1/lv_root to 6718464 (4k) blocks.
The filesystem on /dev/vg_app1/lv_root is now 6718464 blocks long.
Note: Use ext2online instead of resize2fs if it is a Red Hat virtual machine.
11) Check available space:
# df -h

Filesystem            Size  Used Avail Use% Mounted on
/dev/mapper/vg_app1-lv_root
                      26G   10G   14G  42% /
tmpfs                 9.8G     0  9.8G   0% /dev/shm
/dev/sda1             477M   88M  364M  20% /boot
Download the Gparted live CD ISO. Then attach the ISO to CentOS and boot from live cd (go to the virtual machine settings, select “CD/DVD” and select “Use ISO” from the right-side panel). Then select the partition you want to resize. Click on the partition menu (top menu bar) then click on “Resize”. Then select “Apply all operations” from “Edit” menu.
Easy. Go into your VM as root. Type "fdisk -l" - if you already see the new disk size - good.
If not - try partprobe - if you still do not see the new disk size - reboot.
Now fdisk /dev/sda
partprobepvresize /dev/sda2Now your VG VolGroup00 has 20 GB more space. Do whatever you like with it. Just as you would do on a physical system (resize LVs, then resize the FS for example).
For CentOS 6.6 on VMWare, I did the following to increase from 30 GB to 40 GB (note I was not using LVM, just regular native linux partitions (Id 83)):
NOTE: Take a backup of your VM first in case you lose data. You should not lose data if everything goes well.
Info found from a combination of answers on this page and on http://positon.org/resize-an-ext3-ext4-partition
Another approach is to create a LVM spanned on a full disk instead of a partition.
In this case you can hot add disk using following method
blockscan --rereadpt /dev/<PV disk
pvresize /dev/<PV disk>
# The associated VG is now resized
lvresize /dev/mapper/<LV> -r -l +100%FREE
Sometimes you need to do
echo "- - -" > /sys/class/scsi_host/host<n>/scan
It depends on whether you're creating a new disk or extending an existing one as to which type of rescan is required.
Here I am taking a sample partition to expand the disk from 5GB to 7GB with out losing Data. You can change according to your free space available.
Before increasing the disk, I have taken the following details from the Linux VM:
# df -h
 Filesystem            Size  Used Avail Use% Mounted on
 /dev/sda3             6.8G  2.1G  4.5G  32% /
 /dev/sda1              99M   12M   83M  13% /boot
 none                  252M     0  252M   0% /dev/shm
 /dev/sdb1             5.0G   39M  4.7G   1% /mnt/test
# fdisk -s /dev/sdb
Disk /dev/sdb: 5368 MB, 5368709120 bytes
 255 heads, 63 sectors/track, 652 cylinders
 Units = cylinders of 16065 * 512 = 8225280 bytes
Device Boot      Start         End      Blocks   Id  System
 /dev/sdb1               1         652     5237158+  83  Linux
Shut the VM down now.
Now I am going to increase the existing virtual disk (/dev/sdb) from VMware the command prompt. Note: this task should be performed only when the VM is powered off.
Go to the location of virtual disk location.
# vmware-vdiskmanager -x 7Gb RedHatEnterprise_Linux_4-0.vmdk
Now it will grow the virtual disk to 7Gb
Now you need to power on the VM. Log into the VM using PuTTY or the console as the root user.
# df -h
Filesystem            Size  Used Avail Use% Mounted on
 /dev/sda3             6.8G  2.1G  4.5G  32% /
 /dev/sda1              99M   12M   83M  13% /boot
 none                  252M     0  252M   0% /dev/shm
 /dev/sdb1             5.0G   39M  4.7G   1% /mnt/test
It still shows the old size. Unmount the partition which you are going to increase.
# umount /dev/sdb1
Run the file system repair on the disk
# fsck -n /dev/sdb1
Now were are goig to remove the journal from the disk to make it into an ext2 filesystem.
# tune2fs -O ^has_journal /dev/sdb1
Now start partitioning /dev/sdb to assign the increased space to /dev/sdb1. Note: Don’t Panic, you will not lose data here.
I am removing the existing /dev/sdb1 and recreating along with available free space.
# fdisk /dev/sdb
Command (m for help): m
Command action
a   toggle a bootable flag
b   edit bsd disklabel
c   toggle the dos compatibility flag
d   delete a partition
l   list known partition types
m   print this menu
n   add a new partition
o   create a new empty DOS partition table
p   print the partition table
q   quit without saving changes
s   create a new empty Sun disklabel
t   change a partition’s system id
u   change display/entry units
v   verify the partition table
w   write table to disk and exit
x   extra functionality (experts only)

Command (m for help): p
Disk /dev/sdb: 7516 MB, 7516192768 bytes
255 heads, 63 sectors/track, 913 cylinders
Units = cylinders of 16065 * 512 = 8225280 bytes
Device Boot      Start         End      Blocks   Id  System
/dev/sdb1               1         652     5237158+  83  Linux

Command (m for help): d
Selected partition 1

Command (m for help): n
Command action
e   extended
p   primary partition (1-4)
p
Partition number (1-4): 1
First cylinder (1-913, default 1):
Using default value 1
Last cylinder or +size or +sizeM or +sizeK (1-913, default 913):
Using default value 913

Command (m for help): p
Disk /dev/sdb: 7516 MB, 7516192768 bytes
255 heads, 63 sectors/track, 913 cylinders
Units = cylinders of 16065 * 512 = 8225280 bytes
Device Boot      Start         End      Blocks   Id  System
/dev/sdb1               1         913     7333641   83  Linux

Command (m for help): w
The partition table has been altered!
Calling ioctl() to re-read partition table.
Syncing disks.
Now restart the Linux machine to take effect of the partition (we can also use partprobe, it's strictly recommended to restart the machine).
# shutdown now -r
Now once again check the extended file system, if you skip this step, resize2fs command will recommend running it.
# e2fsck -f /dev/sdb1
e2fsck 1.35 (28-Feb-2004)
Pass 1: Checking inodes, blocks, and sizes
Pass 2: Checking directory structure
Pass 3: Checking directory connectivity
Pass 4: Checking reference counts
Pass 5: Checking group summary information
/dev/sdb1: 13/655360 files (7.7% non-contiguous), 22121/1309289 blocks
Now resize the file system.
# resize2fs /dev/sdb1
resize2fs 1.35 (28-Feb-2004)
Resizing the filesystem on /dev/sdb1 to 1833410 (4k) blocks.
The filesystem on /dev/sdb1 is now 1833410 blocks long.
Now check the file system.
# fsck -n /dev/sdb1
fsck 1.35 (28-Feb-2004)
e2fsck 1.35 (28-Feb-2004)
/dev/sdb1: clean, 13/917504 files, 30538/1833410 blocks
Now recreate the partition with the ext3 format.
# tune2fs -j /dev/sdb1
tune2fs 1.35 (28-Feb-2004)
Creating journal inode: done
This filesystem will be automatically checked every 32 mounts or
180 days, whichever comes first.  Use tune2fs -c or -i to override.
Restart the Linux machine once to effectively use the ext3 filesystem.
# shutdown -r now
Once again you login to Linux box using root previleges. Now you can find the partition increased to 7 GB.
# df -h
Filesystem            Size  Used Avail Use% Mounted on
/dev/sda3             6.8G  2.1G  4.5G  32% /
/dev/sda1              99M   12M   83M  13% /boot
none                  252M     0  252M   0% /dev/shm
/dev/sdb1             6.9G   39M  6.7G   1% /mnt/test
I just did this, in VMware, with CentOS 6.4. Answer number 1 is correct, but is missing one step, that I discovered.
In Gparted, mine also had the lock icon.
On the row with the partition, that has the lock icon, right-click and select "de-activate". That makes the lock go away.
Then you can right-click and change the partition size.
Then apply the change.
Then right-click and select "activate".
You can make steps 5 and 6 to be one by adding the -r switch to lvresize. That will make lvresize run resize2fs automatically with the required params:
lvresize -r -l +100%FREE /dev/VolGroup00/LogVol00